Hello, if you are looking for more interesting posts please visit my new blog. Thank you.
Installing WordPress locally on your mac
Here is the simple instruction of how to install wordpress locally on your mac.
It is easy and it takes about 10-15 minutes.
1) First off all, you need to install MAMP (My Apache – MySQL – PHP). Just go to the official MAMP site (http://www.mamp.info/en/) and press big orange “free download” button.
2) Double click on the file “MAMP_MAMP_PRO_3.0.pkg” in your “Downloads” folder, and follow all the instructions that installer provides. I also recommend you to uncheck the “MAMP PRO” option on the 5th step, because you don’t need it at all.
When you finish your installation, in your “applications” folder will appear a new “MAMP” folder. You can start your local web server by launching the MAMP application from your Launchpad, but it is not necessary.
3) Now, you need to download the WordPress from the official site (https://en-ca.wordpress.org/download/) just click on the nice big orange link “zip” or “tar.gz”, whichever you prefer.
After downloading, unzip the archive and move “wordpress” folder to “applications/MAMP/htdocs” directory, so we have all the files in “applications/MAMP/htdocs/wordpress”. We are almost done.
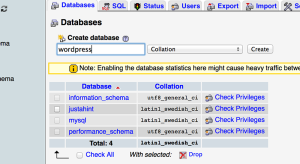
4) All that we need now, is to create a database for our local wordpress site. To do it, launch MAMP from your Launchpad, click on “Start Servers” button and then click on “Open start page” button. On the opened webpage hover “Tools” and click on “phpMyAdmin” link.
Welcome to phpMyAdmin – useful and powerful tool for web masters.
To create a database, click on “Databases” link, type “wordpress” in the text field and click on “create” button.
Congratulations, all the preparations are done, and now you can easily install the wordpress; it is going to take a couple more minutes.
5) Now open your web browser and go to “http://localhost:8888/wordpress”, this will launch the installation process. On the second step just type “root” in “User Name” and “Password” fields, as I did.
Now, you just have to finish your installation and voila, your wordpress installed on your local mac.
Drop down menu on pure css
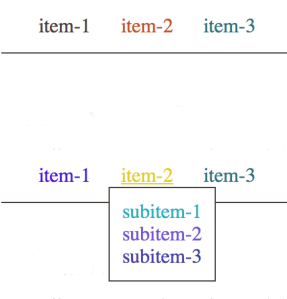
There are a lot of examples of drop down menus written on JS in the internet. But it is also possible to create a drop down menu without using javascript. This method has one huge benefit – your site will work faster without loading extra JS code.
HTML
<menu>
  <div class="menu-item">
    <a href="#">item-1</a>
    <div class="menu-submenu">
      <p><a href="#">subitem-1</a></p>
      <p><a href="#">subitem-2</a></p>
      <p><a href="#">subitem-3</a></p>
    </div>
  </div>
  <div class="menu-item">
    <a href="#">item-2</a>
    <div class="menu-submenu">
      <p><a href="#">subitem-1</a></p>
      <p><a href="#">subitem-2</a></p>
      <p><a href="#">subitem-3</a></p>
    </div>
  </div>
  <div class="menu-item">
    <a href="#">item-3</a>
    <div class="menu-submenu">
      <p><a href="#">subitem-1</a></p>
      <p><a href="#">subitem-2</a></p>
      <p><a href="#">subitem-3</a></p>
      <p><a href="#">subitem-4</a></p>
      <p><a href="#">subitem-5</a></p>
    </div>
  </div>
</menu>
CSS
.menu-item {
  position: relative;
  display: inline-block;
}

.menu-submenu {
  padding: 10px 0;
  border: 1px solid #473F3C;
  background: #fff;
  display: none;
  position: absolute;
  top: 18px;
  left: 0;
  white-space: nowrap;
}

.menu-item:hover .menu-submenu {
  display: block; /* here we show submenu on hover event */
}
This is how our menu will looks like.

The menu will work with all modern browsers.
Random color on javascript
Here is a simple function that creates a random color.
  function randomColor() {
      $letters = '0123456789ABCDEF'.split('');
      $color = '#';
      for (var i = 0; i < 6; i++ ) {
          $color += $letters[Math.floor(Math.random() * 16)];
      }
  }

  $('a').hover(function() {
      randomColor();
      $(this).css('color', $color);
  });
After adding this code every link on your site will randomly change color after you hover it.
Thank you.
How to create percentage bar
Hello, here is example of how create a percentage bar by using only HTML and CSS.
In the final we are going to have this:
We should be able to change the brown background part to illustrate percentage rate.
And it could be easily created by using only HTML and CSS lets see the code.
HTML
<div class="post-percentage-bar">
  <div class="post-percentage-bar-filled"></div>
</div>
CSS
  .post-percentage-bar {
    width: 200px;
    height: 17px;
    background: #d25349;
    border: 1px solid #6a524a;
    border-radius: 10px;
    color: #fff;
  }

  .post-percentage-bar-filled {
    width: 30%;
    height: 17px;
    background: #6a524a;
    border-radius: 10px;
    text-align: center;
    font: Tahoma;
    font-size: 12px;
  }
All that we need is only two blocks and simple CSS code for them.
We can simple change the brown background by changing parameter width for .post-percentage-bar-filled
Lets put width as 80%.
As we can see, now indicator shows 80% filled bar. You can put there a variable from programming language or JS. So with two divs and simple CSS code we can create a nice looking percentage bar. I hope this post was helpful. Good luck.


